

Codex Desktop API Key Setup: Use APIMaster and Claim $20 Free GPT Credit
Learn how to connect Codex Desktop to APIMaster with a custom API key and base URL using the same config.toml and auth.json files as Codex CLI. New users can claim $20 in free GPT credit and start using it inside Codex right away.
You can connect Codex Desktop to APIMaster by editing the same ~/.codex/config.toml and ~/.codex/auth.json files used by Codex CLI. New users can also claim $20 in free GPT credit and start using it inside Codex as soon as setup is complete.
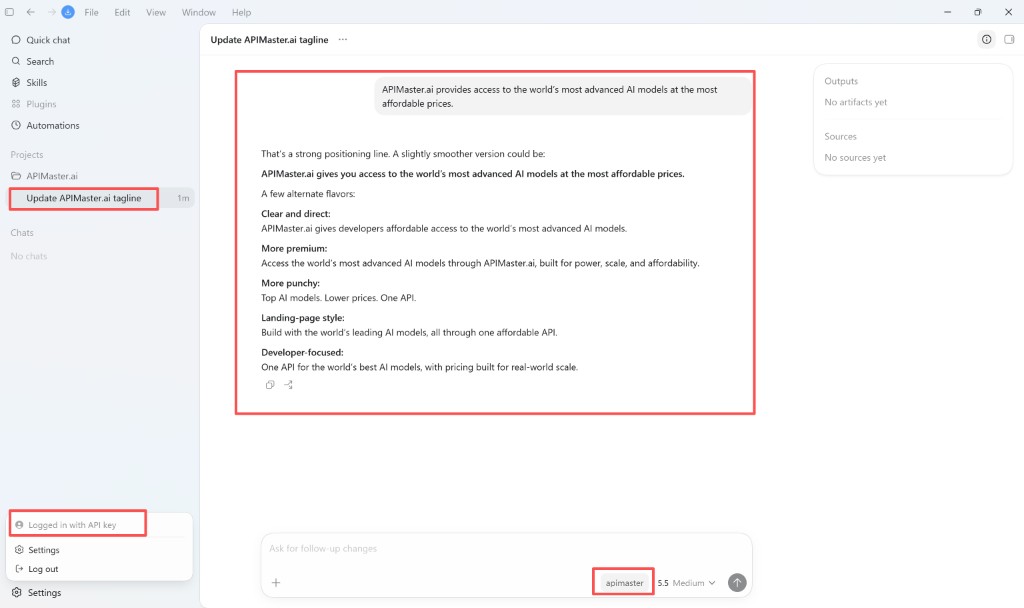
One setup covers Codex Desktop and Codex CLI. After you finish this guide, Desktop should show Logged in with API key and provider apimaster.
Prerequisites: Environment check, API key.
APIMaster.ai
| Item | Value |
|---|---|
| Base URL | https://apimaster.ai/v1 |
| API Key | Console |
| Models | Marketplace or GET /v1/models |
Codex uses https://apimaster.ai/v1 (OpenAI-compatible). No pricing or model guarantees in this doc.
Configure Codex (Desktop + CLI)
Codex home: ~/.codex/ (macOS) or %USERPROFILE%\.codex\ (Windows). Quit Codex Desktop before editing files.
Back up, then replace (required)
If config.toml or auth.json already exist (official Codex login or another API provider):
- Copy backups, e.g.
config.toml.bakandauth.json.bak, in the same folder. - Overwrite each file completely with the snippets below — do not add APIMaster lines to the bottom of your old config or keep duplicate
[model_providers.*]sections.
To restore later, rename your .bak files back to the original names.
Windows
Win + R → %userprofile%\.codex — create the folder if missing. Then replace config.toml and auth.json entirely:
config.toml
disable_response_storage = true
model = "gpt-5.4"
model_provider = "apimaster"
model_reasoning_effort = "high"
model_verbosity = "high"

[model_providers.apimaster]
base_url = "https://apimaster.ai/v1"
name = "apimaster"
requires_openai_auth = true
wire_api = "responses"
auth.json
{
  "OPENAI_API_KEY": "YOUR_API_KEY"
}
Replace YOUR_API_KEY with your APIMaster key from the Console.
macOS
Open ~/.codex (Finder: Go → Go to Folder… → ~/.codex). Back up any existing files, then replace config.toml entirely:
config.toml
model_provider = "apimaster"
model = "gpt-5.4"
model_reasoning_effort = "high"
network_access = "enabled"
disable_response_storage = true
model_verbosity = "high"

[model_providers.apimaster]
name = "apimaster"
base_url = "https://apimaster.ai/v1"
wire_api = "responses"
requires_openai_auth = true
auth.json — same as Windows.
Notes
- Set
modeltogpt-5.5etc. per Supported models. - If
wire_api = "responses"fails on your Codex version, trywire_api = "chat"or remove the line.
| Issue | Fix |
|---|---|
| 401 | Check auth.json key |
| 404 | Model id + account access |
| Timeout | base_url must be exactly https://apimaster.ai/v1 |
Verify Codex Desktop
- Reopen Codex Desktop.
- Confirm Logged in with API key and provider apimaster in the UI.
- Start a chat — you should get replies through APIMaster.
CLI users can also run codex in a terminal to verify the same config.
Advanced: switch official subscription ↔ APIMaster
Use this only if you already use the official ChatGPT subscription in Codex Desktop and want to keep project sidebar history when you hit the rolling 5-hour usage limit.
Manually editing config.toml in that situation often hides project threads. codex-provider-switcher switches provider mode and syncs conversation metadata locally — no upload, no deletion of chat content.
When to use this
- Official subscription shows You're out of Codex messages or Usage remaining near 0% with Resets every 5 hours.
- You want to continue in the same project threads on APIMaster, then switch back to official when the limit resets.

What the tool does
Repo: github.com/RomaCredit/codex-provider-switcher
- Updates local Codex config (
config.toml,auth.json, SQLite, session metadata) - Saves APIMaster and official profiles
- Backs up before changes under
~/.codex/provider-switcher
Windows
- Quit Codex Desktop completely.
- Double-click
codex-provider-menu.bat. - Choose 1 (APIMaster) or 2 (official). Enter API key on first APIMaster switch.
- Reopen Codex Desktop — expect Logged in with API key, apimaster provider, and your project threads still visible.
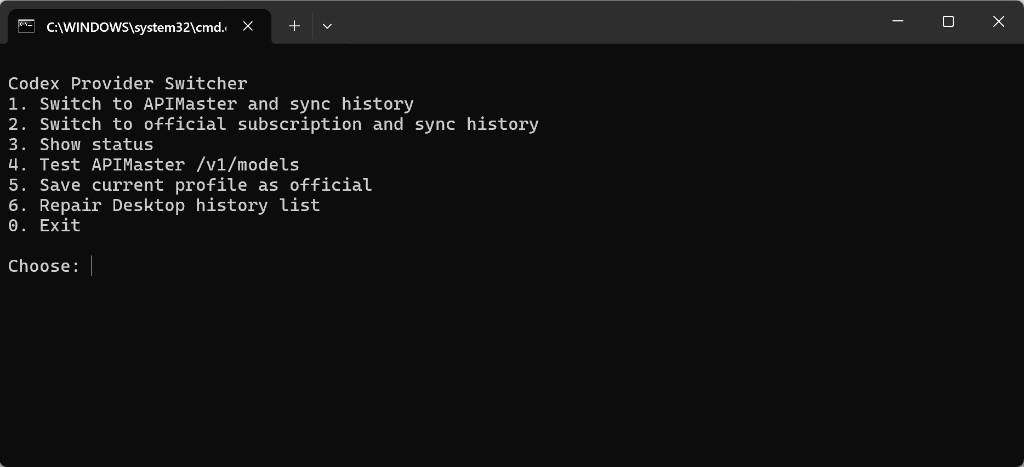
If sidebar history is wrong: option 6. Repair Desktop history list.
PowerShell:
.\switch-codex-provider.ps1 status
.\switch-codex-provider.ps1 apimaster
.\switch-codex-provider.ps1 official
.\switch-codex-provider.ps1 repair-history
macOS
chmod +x ./codex-provider-menu.command
./codex-provider-menu.command
Or:
python3 codex_provider_switcher.py apimaster
python3 codex_provider_switcher.py official
python3 codex_provider_switcher.py repair-history
Security
- Keys and backups stay on your machine only.
- Do not paste
.codexfolders into public issues. - Quit Codex Desktop before switching.
FAQ (switcher)
| Question | Answer |
|---|---|
| History preserved? | Session files remain; tool syncs metadata for sidebar display. |
| Switch back to official? | Yes — menu 2 or official. |
| Key location? | Local ~/.codex/auth.json and tool profiles. |
| Deletes chats? | No. |