Hermes Agent (Hermes Desktop) — Configure Your APIMaster API Key (OpenAI-Compatible)
Hermes Agent is an AI agent by Nous Research; Hermes Desktop is its official desktop client. Learn how to configure APIMaster.ai's OpenAI-compatible API key in Hermes Desktop to use Claude, GPT, and DeepSeek at up to 90% off.
APIMaster.ai is OpenAI-compatible. Hermes Agent (via the Hermes Desktop client) reads two environment variables, then you pick the model in the desktop UI.
What is Hermes Agent
Hermes Agent is an AI agent built by Nous Research, with the tagline "The agent that grows with you." Hermes Desktop is its official desktop client for Windows and macOS — the most common way people run Hermes Agent today. This guide covers Hermes Desktop configuration.
Why use an APIMaster key
- One key, many models — swap between Claude, GPT, and DeepSeek inside Hermes Desktop instead of being limited to Nous's own models.
- Lower cost — up to 90% off official pricing, which matters given how token-hungry agent workloads tend to be.
- Fingerprint-verified providers — APIMaster re-verifies every provider weekly, so you're not handing your agent a substituted/fake model.
- Pay-as-you-go — from $1, no subscription — a better fit for Hermes Agent's bursty usage pattern.
- Works where official APIs are restricted or expensive — built for developers in those markets.
Quick setup
Step 1 — Get your API Key
- Open the APIMaster console.
- Copy your API Key (usually starts with
sk-). - Never paste a real key into chat or screenshots; use the placeholder
your_apimaster_keybelow.
Step 2 — Edit the .env file
Windows
Press
Win + R, paste, and press Enter:%LOCALAPPDATA%\hermesOpen
.envin Notepad (create the file if missing).Typical full path:
C:\Users\YourName\AppData\Local\hermes\.env
macOS
Hermes Desktop shares ~/.hermes with the CLI (official docs). Put keys in ~/.hermes/.env.
Option A — Finder (recommended)
Go → Go to Folder… (
Shift + Command + G).Paste:
~/.hermes(
~= your home folder;.hermesis hidden in Finder unless you use Go to Folder.)Open
.envin TextEdit (create if missing).
Option B — Terminal
open ~/.hermes
Full path
/Users/YourName/.hermes/.env
Step 3 — Add these lines
OPENAI_API_KEY=your_apimaster_key
OPENAI_BASE_URL=https://apimaster.ai/v1
OPENAI_BASE_URLmust end with/v1— nothttps://apimaster.aialone.- No spaces around
=, no quotes unless Hermes docs say otherwise. - Save the file.
Step 4 — Restart Hermes Desktop
Fully quit Hermes (including the tray icon), then open it again.
Choose the model in the app
Open Hermes Desktop.
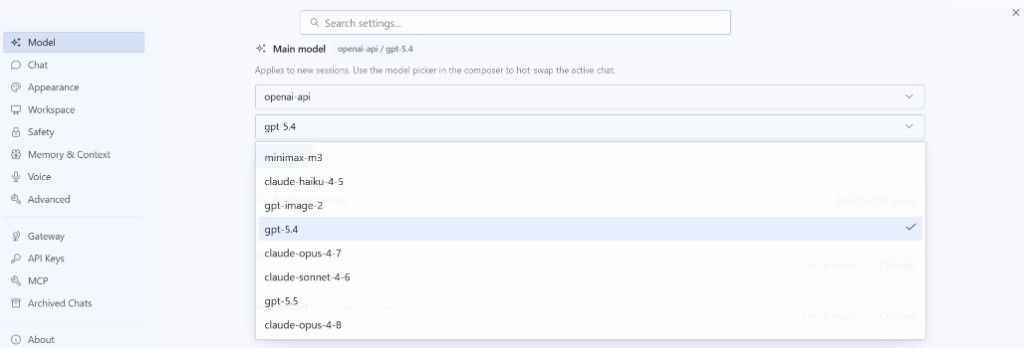
Go to Settings → Model → Main model.
Provider: Custom endpoint.
Model: pick a supported model id, for example:
claude-opus-4-8claude-sonnet-4-6gpt-5.5gpt-5.4
See the marketplace or your admin for the full list.
Click Apply, then close Settings.
Test: pick a model and send a message
1. Set the main model in Settings (required)
- Open Settings (sidebar or bottom-left).
- Go to Model → Main model.
- Provider: Custom endpoint (or openai-api if shown).
- Open the Model dropdown and click an id (e.g.
gpt-5.4) — do not type a display name. - Click Apply and close Settings.
New chats use this model after Apply; old chats may still use the previous one.
2. Start a new chat
- Return to the chat list.
- Click New chat (or +).
- Use a fresh session, not an old thread.
3. Check the active model (recommended)
Near the input you may see something like openai-api / gpt-5.4. If it is wrong, fix Main model, Apply, and open another new chat. Some builds also offer a small model dropdown beside the composer.
4. Send a test message
Type Hello, reply with ok and press Enter. A normal reply means Key, base URL, and model are working.
5. Still failing?
Check error text (401, 404, timeout), confirm Hermes was restarted after editing .env, or run API connectivity test with the same key.
FAQ
| Issue | What to check |
|---|---|
| Send fails | URL is https://apimaster.ai/v1; key copied fully; model id exact; Hermes restarted after .env edit |
| Folder missing | Use ~/.hermes on Mac (not Application Support); launch Hermes once or mkdir -p ~/.hermes |
| No Custom endpoint | Update Hermes to the latest version |
| Wrong models | IDs come from APIMaster; see Supported models |
Optional: API connectivity test with the same key.
Security
- Do not share API keys in Slack, email, or public docs.
- Use placeholders in tickets and screenshots only.
- If leaked, revoke the key in the console, update
.env, and restart Hermes.
Checklist
- API Key copied from console (kept private)
-
OPENAI_API_KEYset in.env -
OPENAI_BASE_URL=https://apimaster.ai/v1(with/v1) -
.envsaved - Hermes fully restarted
- Provider = Custom endpoint, model id selected, Apply clicked
- Test message works in a new session